Terminal-based Git operations
Installing Bash
It’s easiest to interact with Git via Bash; the Unix command processor. For Windows users there is a Windows Subsystem for Linux (WSL) with which you can install a Linux distribution (e.g., Ubuntu). WSL enables you to use the Linux Operating System of your choice via the command line. For details on how to install Linux on Windows see the Windows documentation.
Installing Git
To install Git go to this website Git download and choose the correct version for your operating system (Linux/Unix if you are using WSL). After the download is completed, open the file and follow the instructions. For a detailed guide on the settings see: Git installation guide.
You can use Git directly via your terminal (Bash, Powershell), or an IDE, for example, VSCode. Visual Studio Code (VSCode) is a code editor to develop, run and debug code.
To enable Git in VS Code on Windows:
- Go to ‘File’ > ‘Preferences’
- Go to ‘Settings’
- Type ‘Git: Enabled’ in the search bar
- Make sure that the box is ticked
To enable Git in VS Code on Mac:
- Got to ‘Code’ > ‘Preferences’
- Go to ‘Settings’
- Type ‘Git: Enabled’ in the search bar
- Make sure that the box is ticked
To configure your Git Login, we will need to set your username and email address in Git. To do so, open the terminal:
- Navigate to the ‘terminal’ tab (see below),
- click on the arrow next to the plus sign.
A list of various terminals will open, select ‘Git Bash’.

Set your commit email address in Git: git config --global user.name "yourusername"
Set your username in Git: git config --global user.email "email@youremail.com"
Great! Now we can start with the actual Git commands.
Git commands
When working with git, there are a few operations we would want to do:
clone: Fetch code from a repository (or, not discussed here: mark a directory that git should use as a working directory). These are local files.add: Add any files that git should be tracking new changes for.- Edit the files.
commit: Confirm these are the changes we want to be a particular version.push: Sync local changes with a remote repository (e.g., one on GitHub).pull: After a while, sync our local repository with changes made by someone else on a remote repository (this might produce conflicts).
These commands will be discussed below.
git clone
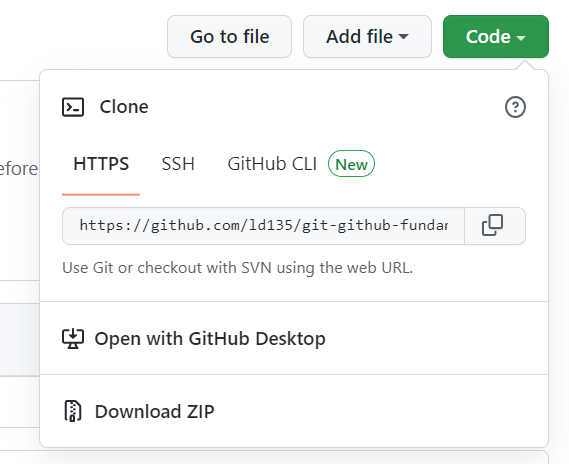
Projects typically start with cloning a remote (GitHub) repository to your computer (you can also make one locally and sync it later, but this is easier). Cloning simply means creating a local copy of that repository with its version control history (this typically gives you the most recent version by default if it’s an existing repository). To do so, you need to have the repository’s URL or SSH key (to use the SSH option you first have to set up an SSH key for your GitHub account). You find these options when clicking on the “Code” button in your GitHub repository.
We should add info on how to do SSH authentication, because password access is deprecated.
The git command for cloning is: git clone [URL here] (replace “[URL here]” with the copied HTTPS link from your GitHub repository), e.g. git clone https://github.com/tcsai/tcsai.github.io.
The repository will be cloned into your current working directory when entering the git command. So make sure you’re in the desired directory when cloning your repository.
git add
Apart from the files that were already in the repository, you might have new files that git doesn’t know about. The files being in the directory is not enough! You have to actively tell git to track them. You can do this with git add:
- Git command to add a single file:
git add filename(replace “filename” with the actual name of the file + extension(“.txt”, “.py”, …) - Git command to add all files that have been changed:
git add .
Make some changes
Git is a versioning system. Your empty repository (usually only has a README, or a few pre-prepared files) is a version. These versions are identified by a unique hash (a serial number). These are typically long (e.g., 4534b009d84a7b3b01782a87ea4680520a5f617c) but are often abbreviated (here: 4534b00, the probability of two versions in the same repository having the same shortened hash is almost zero). To confirm that a set of changes you made are a version, you ‘commit’ to those changes. After you issue this command, Git checks what the differences are between this commit, and the previous one (which will typically between a set of insertions and/or deletions). Through this, git can track the history of the project and show you versions at particular times. It is generally good practice to commit often; commits should reflect one particular (working) change or task you completed. Implementing multiple things and then versioning that under one commit makes it less clear to anyone reading the version history.
git commit
So, when you commit changes, Git requires you to enter a log message. This serves the same purpose as a comment in a program: it tells the next person to examine the repository why you made a change. By default, Git launches a text editor to let you write this message. To write a short single line message you can use the command:
git commit -m “short message”
If you run git commit on it’s own a text editor will open. Enter your commit message and then close the text editor.
Committed the changes. You can “push” (i.e., sync) them to your git repository.
git push
After you have made, and commited some local changes in your cloned repository (local here meaning on your system, which is now different from the version on GitHub) you want to “push” your changes to the GitHub repository (or elsewhere, if relevant). The git command is: git push. If you want to be more specific, you can add git push remote-name branch-name (the “remote-name” is usually “origin” and the “branch-name” is usually “main”) so the command would look like this: git push origin main.
It pushes the changes you made on your current branch (main) to the remote GitHub repository (origin). Note: as you cloned your repository, the remote “origin” was automatically added so git knows where to push to. If you would have created a new git repository without cloning, you would have to set up the remote yourself. We won’t discuss branches, pull requests, and other more advanced git operations here.
git pull
Suppose something has changed in your GitHub repository and you want to get those changes to your local repository. Instead of “pushing” to the GitHub repository, you want to “pull” from it. The git command is: git pull, or alternatively: git pull remote-name branch-name (see push for explanation). This command syncs everything from the remote repository associated with the current project; i.e., it merges any changes into your local repository.
Conflicts
Git can handle most merges on its own with automatic merging features. Conflicts generally arise when two people have changed the same lines in a file, or if one developer deleted a file while another developer was modifying it. In these cases, Git cannot automatically determine what is correct. Conflicts only affect the developer conducting the merge, the rest of the team is unaware of the conflict. Git will mark the file as being conflicted and halt the merging process. It is then the developers’ responsibility to resolve the conflict.
Types of merge conflicts
A merge can enter a conflicted state at two separate points. When starting and during a merge process. The following is a discussion of how to address each of these conflict scenarios.
Git fails to start the merge
A merge will fail to start when Git sees there are changes in either the working directory or staging area of the current project. Git fails to start the merge because these pending changes could be written over by the commits that are being merged in. When this happens, it is not because of conflicts with other developer’s, but conflicts with pending local changes. The local state will need to be stabilized using git stash, git checkout, git commit or git reset.
A merge failure on start will output the following error message: error: Entry '<fileName>' not uptodate. Cannot merge. (Changes in working directory)
Git fails during the merge
A failure DURING a merge indicates a conflict between the current local branch and the branch being merged. This indicates a conflict with another developers code. Git will do its best to merge the files but will leave things for you to resolve manually in the conflicted files.
A mid-merge failure will output the following error message: error: Entry '<fileName>' would be overwritten by merge. Cannot merge. (Changes in staging area)
merging two branches with conflicts
When there is a conflict during a merge, Git tells you that there’s a problem, and running git status after the merge reminds you which files have conflicts that you need to resolve by printing both modified: beside the files’ names. Inside the file, Git leaves markers to tell you where the conflicts occurred. In many cases, the destination branch name will be HEAD because you will be merging into the current branch. To resolve the conflict, edit the file to remove the markers and make whatever other changes are needed to reconcile the changes, then commit those changes.
More advanced operations
git remote
If your current directory is a git repository you can list the remotes for this repository with git remote.
To add a new remote use the command git remote add remote-name URL. Replace “remote-name” with the name for the new remote and “URL” with the copied HTTPS link from your GitHub repository.
git status
To get an overview on what’s going on in your repository you can use the git status command. It will show you which files have been changed but are not yet staged; which files are staged but have not yet been committed; and if you added new files also if a file is not yet tracked by Git and has to be added to the staging area.
Branching
One of the reasons Git is popular is its support for creating branches, which allows you to have multiple versions of your work, and lets you track each version systematically. Each branch is like a parallel universe: changes you make in one branch do not affect other branches (until you merge them back together).
git branch: lists all of the branches in a repository, the branch you are currently in will be shown with a * beside its name
git diff branch1..branch2: shows the differences between two branches
git checkout branch: switches to that branch (only works if all of your changes have been committed)
git checkout -b branch: creates a new branch and switches to it in one step
Branching lets you create parallel universes; merging is how you bring them back together. When you merge one branch (call it the source) into another (call it the destination), Git incorporates the changes made to the source branch into the destination branch. If those changes don’t overlap, the result is a new commit in the destination branch that includes everything from the source branch.
git merge source destination: merges two branches
Git commands via VScode
For an explanation on how to use the Git commands via the VScode interface rather than the terminal have a look at the VScode docs.
Further Resources
You can find a cheat sheet for Git commands here: Git Commands
Crash Course Git & GitHub: